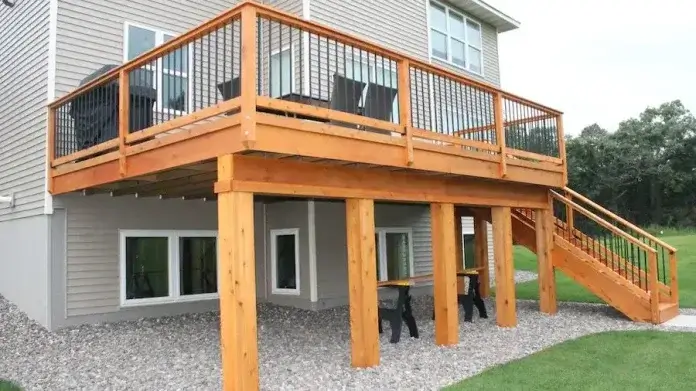

In this article, “How to Build a Wood Deck,” we provide beginners with a quick summary of what’s involved in building a deck and help you decide whether you may want to build one yourself – or hire the Pros.
To those with prior experience, building a deck is a straightforward project that can be completed in 2 to 3 days, even by DIY homeowners with average to above-average building skills and a friend or two for backup :)
Let’s run through the basics of deck building – and help you decide what’s right for you.
How To Build A Wood Deck: Step-By-Step
1) Planning
The First step in making a deck is “planning” the size and shape of the deck you plan to build and the materials you will use. There are a ton of deck ideas online to consider.
The next step in building a deck is understanding the Parts of a Wood Deck. Being familiar with all of the wood deck components will make this project much easier – please see the List of Deck parts below;
How To Build a Deck Frame:
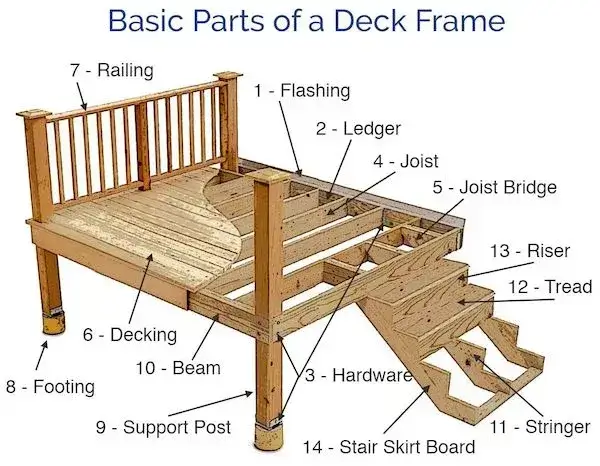
Planning your Deck:
- Size and shape: The size and shape of your deck will depend on your needs and space constraints.
- You may want to consider a smaller deck if you have a small yard. If you have a large yard, you may feel a more extensive deck with more features, such as a built-in barbecue, a hot tub, or a pergola.
- Materials: The materials you use for your deck will depend on your budget and personal preference. Pressure-treated wood is a good option for decks exposed to the elements.
- If you want a deck that will last for many years, you may want to consider using composite decking materials.
- Permits: Before building a deck, you may need to obtain a permit from your local government. Check with your local building department to find out what the requirements are in your area.
- Don’t forget you may also need to obtain the necessary permits from your local building department.
2) Site Prep Before Building a Deck:
Once you have a plan, prepare the site for your deck. This includes clearing the area of debris, leveling the ground, and digging footings for the posts.
Four Steps for Site preparation before building a Deck:
- Clear the area of debris: Remove any trees, shrubs, or other objects from the area where you will be building the deck.
- Level the ground: Use a level to ensure the ground is level where you will be building the deck. If the ground is not level, you must fill in any low spots or raise any high spots.
- Dig footings*: The footings are the foundation of your deck. They need to be strong enough to support the deck’s weight, so it is essential to do them right.
*The size and depth of the footings will depend on the size and weight of your deck and the soil conditions.
3) Pouring Cement Footings for Wood Deck
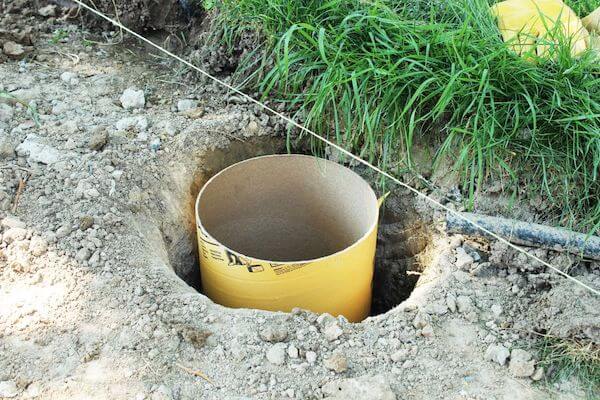
Footings are poured cement piers set in the ground anywhere from 18-48″ deep, depending on the frost line of your region.
The Footings are the foundation of your deck and are critical to place and set correctly.
Personally, I dig holes for footings 50″ deep and use the Quickcrete concrete forms for footings 10″ x 48″ overall. I plumb and level the footings in place and pour concrete for a clean, finished footing.
How To Install QUIKCRETE Footing Forms (Video)
I also think you waste less concrete using the concrete form method instead of just dumping concrete in a big hole.
It is important to do them right because they need to be strong enough to support the deck’s weight. The size and depth of the footings will depend on the size and weight of your deck and the soil conditions.
Three basic steps to install footings for a deck:
- Dig the holes: Dig the footings using a post-hole digger or a power auger. The holes should be at least 12 inches deep and 18 inches wide.
Consult the local frost line chart or check with your building supplier to determine your region’s recommended depth of footings.
- Pour the concrete: Once the holes are dug, pour the concrete into them, ensuring it is level.
- Allow the concrete to cure: Allow the concrete to cure for at least 24 hours before you start building the deck.
4) How to Install Ledger Board for Wood Deck:
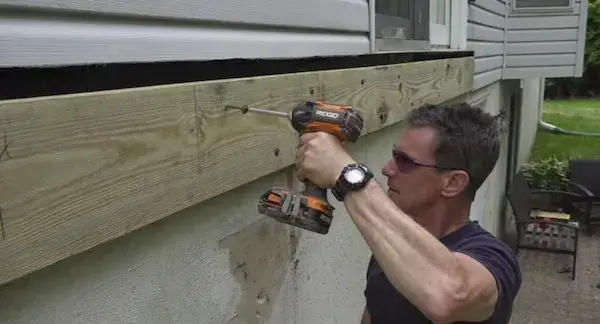
The ledger board is the horizontal board of the new deck that attaches to the framing of your house. It is one of the most essential parts of the deck, so it is vital to ensure it is installed correctly.
Note: The ledger board should be attached to the house using large 4-5″ lag screws and washers.
The four steps involved in installing a Ledger board for the Deck:
- Locate the ledger board: The board should be installed on the “Rim Joist” of your home. These are the exterior perimeter joists used for your primary floor framing.
The deck’s ledger board is installed at the same height as the joists. *IMPORTANT: Measure and deduct the thickness of the deck boards you use, and set the ledger level at the correct height to meet entryways.
- Use a 4—or 6-foot level to ensure the ledger board is level before you fasten it, partially setting a large nail into the Rim Joist.
- Attach the ledger board: Once the Ledger board is Level and Temporarily in place, Use lag screws (min. 4″ long) and lock washers to attach the ledger board to the house.
- Ensure the screws or bolts are long enough to penetrate the house framing at least 3″ deep. Remember that the ledger board is the component that secures your deck to the house.
5) Layout for Joists of Wood Deck

The joists are the horizontal boards that support the deck. They are attached to the ledger board and the posts. The joists are spaced evenly, usually at 24″ ON CENTER, and they should ALWAYS be made of pressure-treated wood.
Here are the three steps for installing deck joists:
- Cut the joists to a length: Use a saw to cut the joists to the correct length. The joists should be long enough to span the distance between the ledger board and the posts.
- Attach the joists to the ledger board: Use joist hangers to attach the joists to the ledger board. Make sure that the joists are level.
- Attach the joists to the posts: Use galvanized nails or screws to attach the joists to the posts. Make sure that the joists are level.
NOTE: If you intend to add “Stairs” to your Deck, you should enlist the help of an experienced friend or carpenter. Stairs are built next, just before the Deck Railings are Installed.
6). Deck Railings:
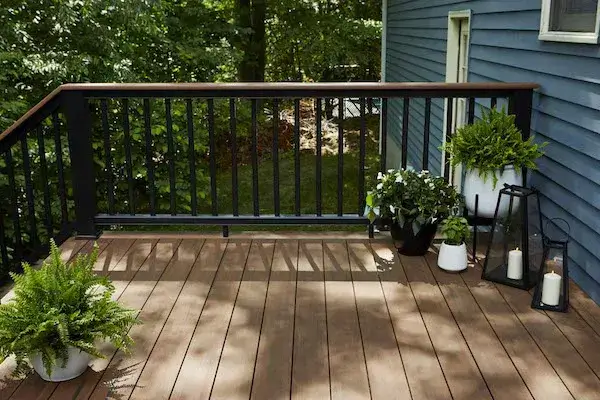
The railing is a necessary safety feature for your deck. Most municipal building codes require installing it at least 36″ High.
A deck railing not only provides a barrier to prevent people from falling off the deck, but it can also add to the overall aesthetic of the deck.
There are many different deck railings, including aluminum or cedar, but the most common type is a 2 x 4 treated wood railing supported by 2 x 2 balusters (spindles).
7) Common List of Deck Materials:
The materials you will need to build a wood deck railing will vary depending on the type of railing you choose to develop.
We recommend bringing a sketch to your local lumber yard and requesting a price for all necessary materials to build the wood deck of your choice.
In most cases, lumber yards and home improvement stores already have a complete list of materials and must plug in the size of the deck you want to build.
Before you go, you may want to decide whether you have the budget to build a traditional wood deck with treated pine deck boards, railings, and balusters.
You can upgrade to composite materials such as the TimberTech Brand – Deck or other recycled polymer decking material brands.
With TimberTech deck materials, you’ll never have to stain and re-stain every couple of years – and they warranty the deck materials for 50 years against certain defects.
The most common Deck materials include:
- Pressure-treated wood: Pressure-treated wood is a type of wood that has been treated with chemicals to make it resistant to rot and decay. This is essential for any deck railing, as it will be exposed to the elements.
- Composite Deck Materials: Many brands are available, considered a big upgrade, but at a significant cost over treated wood.
- Deck screws: Deck screws are a type of screw that is designed for use in outdoor applications. They are made of corrosion-resistant materials and have a sharp point that makes them easy to drive into wood.
- Wood glue: Wood glue is used to join pieces of wood together. It is essential to use a type of wood glue that is designed for outdoor use.
- Stain or paint: Stain or paint protects the wood of your deck railing and gives it a finished look. Many types of stains and paint are available, so you can choose a product that meets your needs.
- Concrete: Quickcrete is typically sold in 50 lb. bags and, when mixed with water, sets up in 20-30 minutes.
8) Tools Needed to Build Deck:
The tools you will need to build a wood deck railing will also vary depending on the type of railing you choose to develop. However, some of the most common tools include:
- Circular (Rip) Saw
- Driver/Drill
- Level
- Tape measure
- Pencil
- Post Hole Digger
- Garden Hose for Concrete Footings
- Safety glasses: To protect your eyes from flying wood chips and other debris.
Below is a quick video showing the basic steps to building a deck, which closely follows our guide.
How To Build a Deck (Video)
Additional Tips for Building a Wood Deck
A Few More Tips for building a Wood Deck:
- Make sure that the railing is level. This is important for safety and visual appeal.
- Use pressure-treated wood for all of the framing and deck material. This will help to protect the wood from rot and decay.
- Make sure that all of the connections are secure. Always use galvanized nails or screws, and pre-drill all holes when using lag or thru bolts.
- Inspect the railing regularly for any signs of damage. If you see any damage, repair it immediately.
Frequently Asked Questions (FAQ)
Q: What Are the Basic Steps For Building a Deck?
The five basic steps involved in Building a Deck are as follows:
- Plan Your Deck Size: The first step is to plan the railing. This includes deciding on the railing height, the type of railing, and the materials you will use.
- Pour the Footings: Once you have your deck plan laid out, you need to dig and pour the cement footings to set your deck posts on. (Alternatively, you can set the deck posts “in concrete” as you pour the concrete.)
- Start Building: Once you have a plan, attach the ledger, assemble the floor joists, and set the deck boards.
- Assemble the railing. Once the deck is built, you need to assemble the railing. This includes attaching the horizontal rails to the posts and the balusters to the rails.
- Stain and Finish the railing. Once the railing is assembled, you will need to finish it. This includes staining or painting the fence and adding any other decorative elements.
Q: Should I Build a Deck or Hire a Builder?
A: If you’ve never built your wood deck or helped someone else create a deck, you may wonder, “Should I build a deck or Hire a Builder?”
By reading the How to Build a Wood Deck steps above, you can discover how to build a deck and determine the following:
A) If You have the skills to build a Deck Yourself.
B) The Desire to take on a Deck project by Yourself
C) Whether you should Hire a Professional builder.
Conclusion:
I like to think of a wood deck as an “extension of your home.” Think about it; if you build a 12′ x 14′ wood deck, you just added 168 Square feet of (outdoor) living space to your home!
However, as necessary of a home improvement as that may be – If you’ve never built a deck before, we highly recommend getting help from a friend or neighbor who has built one (or ten:)
Once you have personal experience with the basic but essential steps, building your wood deck is a cinch.
Remember to check with local building authorities before you start. This project may require a building permit, which can be important if or when you sell the house!
Please Leave us a Google Review. Your feedback helps us grow and lets other homeowners discover our site. Click Here to share your thoughts on Google!
Additional References & Resources
- More Tips & Tricks on How To Build a Pergola – RonHazlelton.com
- Cheapest Way to Build Wood Privacy Fence – Best Home Gear
- 25 Outstanding “Pergola Designs” You Should Check Out – TheSpruce.Com
- The Best Small Air Compressors to Buy – Best Home Gear